
Many visually impaired people identify currency notes by touching them. But as people grow older, their touch sensitivity may gradually decrease, making it difficult to recognise the correct denomination accurately. Imagine an elderly shopkeeper in a small roadside store who has weak eyesight and struggles to identify the money given by customers. In such situations, there is always a chance of con
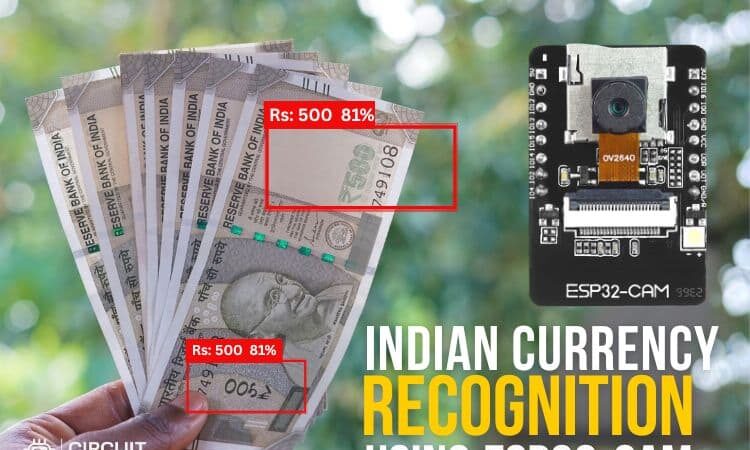
Many visually impaired people identify currency notes by touching them. But as people grow older, their touch sensitivity may gradually decrease, making it difficult to recognise the correct denomination accurately. Imagine an elderly shopkeeper in a small roadside store who has weak eyesight and struggles to identify the money given by customers. In such situations, there is always a chance of confusion or receiving the wrong amount. To make this process easier, we have done a smart Indian currency recognition system using ESP32-CAM. The system captures the image of the Indian currency note, identifies the denomination within seconds using cloud processing, and announces the result through a speaker, helping visually impaired people handle money more confidently and independently. Let’s dive in and see how to make the system from scratch. You can also check out similar AI projects and ESP32-Cam projects done previously here at Circuit Digest.
ESP32-CAM Indian Currency Recognition-Quick Overview
| Feature | Details |
| Primary microcontroller | ESP32-CAM (with OV2640 camera) |
| Image processing method | Cloud-based AI via CircuitDigest Cloud API |
| Audio output | Google TTS → MP3 → PAM8403 amplifier → speaker |
| Supported denominations | ₹10, ₹20, ₹50, ₹100, ₹200, ₹500 |
| Internet requirement | Yes – Wi-Fi for cloud API call and TTS |
| ML training required | No – uses pre-trained CircuitDigest Cloud model |
| Difficulty level | Beginner–Intermediate |
Components Required For Indian Currency Recognition Using ESP32-Cam
The components below are the ones that are used to build the ESP32-CAM Indian currency recognition tutorial.
| S.No | Components | Purpose |
| 1. | ESP32-Cam | It is the main controller and is used to capture the images |
| 2. | Speaker | Used to know the denomination of the currency |
| 3. | Pam 8403 | Used for the audio amplification of the system |
| 4. | Push button | Used to trigger the system to take the picture |
Circuit Diagram of Indian Currency Recognition Using ESP32-CAM
The circuit diagram below shows that the Pam8403, speaker, and pushbutton are connected to the ESP32-Cam. The Pam8403 is used for audio amplification, the push button is used to trigger the image capture, and the speaker is used to indicate what denomination it is.

Pin Connection Summary – ESP32-CAM to Peripherals
| ESP32-CAM Pin | Connected To | Notes |
| GPIO 2 | Push button (one leg) | Other leg to GND; use INPUT_PULLUP in code |
| GPIO 4 (or GPIO 12) | PAM8403 audio IN | PWM audio output to amplifier input |
| 5 V & GND | PAM8403 VCC & GND | PAM8403 operates on 2.5–5.5 V |
| PAM8403 output | 8 Ω speaker | Left or right channel output to speaker terminals |
ESP32-CAM Indian Currency Recognition – Hardware Setup
The Hardware connection shows that all components are connected to make the complete currency recognition setup. Mount the setup in a stand to make the system stable and easy to capture the images with clarity.

How Does Indian Currency Recognition Using ESP32-CAM Work?
Understanding the end-to-end workflow helps you debug issues quickly. Here is the complete ESP32-CAM Indian currency recognition using image processing. After the connections are made according to the circuit diagram. With the push button, we should take the picture of the indian currency or the real Indian currency like 20rs,100rs,500rs etc.,. After that, the picture is sent to the currency recognition API of the CircuitDigest Cloud. The cloud recognises and will send the results of the image back to the system. The system prints the denomination in the serial monitor. With the help of the TTS, the system reads what denomination it is and announces the value of the denomination in the speaker. We also built an interesting project related to object detection, spare some time and go through our Object Detection using ESP32-CAM and Edge Impulse project.
Setting Up CircuitDigest Cloud for Indian Currency Recognition
Step 1⇒ Create a CircuitDigest Cloud Account and Locate the Currency Recognition API
First, you need to make an account in the CircuitDigest Cloud. If you already have one, just get into the CircuitDigest Cloud website, scroll down, and there you will notice the currency recognition feature, click that, and enter.

Step 2⇒ Configure the Confidence Threshold
There, you will notice the try api section, various options like image, classes, confidence, result, and board selection section with its relevant codes. First, you can minimize and maximize the confidence level according to your needs because the confidence value sets the minimum probability threshold for currency recognition. A higher value results in more accurate recognition but may miss some, while a lower value detects more objects but with less certainty.

Step 3⇒ Test the API Without a Microcontroller
Now, to try without any microcontroller boards, you need to take a picture that is showing Indian Currency. Upload it to the image section and click run test. In a few seconds, you will get the result with confidence value and count.

Step 4⇒ Copy the ESP32-CAM Code from CircuitDigest Cloud
Below the page, you can see the microcontroller selection; select ESP32-Cam. Click the ESP32-Cam, and the website will give you the code. Just copy the code and paste the code in the Arduino IDE. In that copied code, change the Wi-Fi SSID, Password, and API Key, then upload the code. Now take any dummy picture from the internet that has indian currency, or you can test this in real time by taking a picture of the real indian currency.

The image below shows the captured image from the ESP32-Cam. Along with it, you can see the recognition results of the image and the denomination of the currency. Below that, the serial monitor displays the recognised output, which includes the count and the confidence value for each identified currency.

Why Use CircuitDigest Cloud Instead of Edge Impulse or TensorFlow Lite?
What sets this ESP32-CAM Indian currency recognition project apart from others using the ESP32-CAM board is that it doesn’t require any machine learning on your part. Most other methods of getting a currency recognition ML model trained on-device typically involve collecting hundreds of images of different denominations of currency and then manually labelling those images, sending the entire labelled dataset to a training platform where it will be used to train the model. Once the model has been trained, you have to convert it to either TFLite or the Edge Impulse model format and then install it on your ESP32-CAM device; this typically takes days. What makes this possible with CircuitDigest Cloud:
» No need for collecting datasets or labelling images manually
» There is no model training time or GPU resources required
» There is no need to register anywhere else other than at CircuitDigest Cloud (which is free) to use the API
» The model will be maintained and updated by CircuitDigest
» You can generate the ESP32-CAM source code with one click for you
» Your same CircuitDigest API key can be used across multiple features offering from CircuitDigest (object detection, face detection, currency recognition, etc.)
ESP32-CAM Indian Currency Recognition Code Explanation
The program first connects the ESP32-CAM to Wi-Fi and initialises the camera with image quality settings for better currency recognition accuracy. After the push button is pressed, the ESP32-CAM captures a high-resolution image and stores it temporarily in memory. The captured image is then uploaded to the CircuitDigest Cloud API for AI-based currency recognition. Once the cloud processes the image, the recognised denomination value is extracted from the API response. The program then downloads MP3 audio data using the Google Text-to-Speech service and plays the recognised denomination through the speaker using audio libraries. Simultaneously, the integrated web server manages live camera streaming, dashboard updates, snapshot capture, and real-time monitoring functions.
1. Wi-Fi and API Credentials
const char* WIFI_SSID  = "yourssidname";
const char* WIFI_PASS  = "yourwifipassword";
const char* API_KEY    = "yourapikey";
const char* serverName = "www.circuitdigest.cloud";
const char* serverPath = "/api/v1/currency-detection/detect";
const int   serverPort = 443;
This section stores the Wi-Fi credentials and CircuitDigest Cloud API details. The ESP32-CAM uses these credentials to connect to the internet and communicate with the cloud AI server for currency recognition. The server path specifies the API endpoint where the captured image will be uploaded.
2. Camera Initialisation and Image Quality Settings
cfg.frame_size   = FRAMESIZE_UXGA;
cfg.jpeg_quality = 8;
cfg.fb_count     = 2;
cfg.fb_location  = CAMERA_FB_IN_PSRAM;
sensor_t* s = esp_camera_sensor_get();
s->set_sharpness(s, 2);
This part of the code improves the image quality of the ESP32-CAM. The resolution is set to UXGA (1600×1200) for detailed image capture, while JPEG quality is reduced for sharper images. The sharpness setting enhances the visibility of currency details, improving AI recognition accuracy.
3. Uploading the Image to the Cloud API
client.printf(
 "POST %s HTTP/1.1\r\n"
 "Host: %s\r\n"
 "X-API-Key: %s\r\n"
 "Content-Type: multipart/form-data\r\n",
 serverPath, serverName, API_KEY);
client.write(buf, len);
This section sends the captured currency image to the CircuitDigest Cloud API using an HTTP POST request. The image is uploaded securely along with the API key, allowing the cloud AI to process the image and identify the denomination.
4. Google Text-to-Speech (TTS) Audio Playback
String path =
"/translate_tts?ie=UTF-8&q=" +
encoded +
"&tl=en&client=tw-ob";
WiFiClient httpClient;
httpClient.connect("translate.google.com", 80);
It converts the recognised denomination into speech using the Google Text-to-Speech service. The ESP32 sends the denomination text to Google servers and receives MP3 audio data, which will later be played through the speaker.
5. Main Detection Workflow
void detectCurrency() {
 camera_fb_t* fb = esp_camera_fb_get();
 String currency =
   sendImageToAPI(fb->buf, fb->len);
 playMP3(mp3Buf, mp3Len);
}
This part of the code contains the main workflow of the project. The ESP32-CAM captures the image, sends it to the cloud AI for currency recognition, receives the denomination result, and finally announces the recognised currency through the speaker using audio playback.
Live Demo: ESP32-CAM Reads Indian Currency Notes Aloud for Visually Impaired Users
Troubleshooting the ESP32-CAM Indian Currency Recognition System
| Issue | Likely Cause | Fix |
| API request timeout | Slow or unstable Wi-Fi connection | Move closer to the router; increase the timeout value in the HTTPS client; use a 2.4 GHz network (ESP32-CAM does not support 5 GHz) |
| 401 Invalid API key error | API key copied with extra spaces or truncated | Recopy the key from your CircuitDigest Cloud account; paste directly into the code string with no leading/trailing spaces |
| Poor recognition accuracy | Blurry image, bad lighting, or the camera is too far | Fix camera distance at 10–15 cm; use diffused white lighting; increase sharpness setting; avoid glossy or folded notes |
| No audio output from the speaker | Wrong GPIO pin or PAM8403 wiring error | Verify the audio GPIO matches the code; confirm PAM8403 VCC is 5 V and GND is shared with ESP32-CAM; test the speaker with a direct 3.3 V signal |
| Camera init failure at boot | Insufficient power or a loose ribbon cable | Use a 5 V / 2 A supply; reseat the camera ribbon; flash with GPIO 0 pulled to GND, then release before normal operation |
| Google TTS is not playing | Google endpoint change or HTTP port blocked | Try port 443 (HTTPS); check for updated TTS URL in the CircuitDigest Cloud code generator; use a fallback offline MP3 file stored in SPIFFS |
Advantages and limitations of the Indian Currency Recognition System with ESP32-Cam
The following table gives a clear idea about the limitations and the advantages of Currency recognition using ESP32-Cam
| S.No | Advantages | Limitations |
| 1. | Automatically recognise Indian currencies in real time | Requires a stable internet connection for cloud processing |
| 2. | Consume less power, and installation is so simple | Recognition accuracy depends on camera quality |
| 3. | Reduces dependency on others while handling money | Poor lighting can affect recognition results |
| 4. | Can be upgraded with automatic note recognition in future | Cloud API usage may have daily or monthly limits |
| 5. | Easy to modify for different currencies or languages | Folded or damaged notes may reduce accuracy |
| 6. | Beginner-friendly AI project without ML training complexity | Background objects may sometimes affect recognition |
The key advantage of this setup we don’t need to take any datasets manually or download them from the internet, don’t need to label the objects, or create any model. With the help of the CircuitDigest Cloud, we are just flashing the code and using it like a readymade model. This saves time, and also with this time we can focus more on the other hardware modifications for future enhancements. This method will eliminate the use of ML training websites like Edge Impulse and TensorFlow Lite. Not only have we done another version of currency recognition, which is the ESP32-CAM Currency Recognition System, using Edge Impulse, go through the project for full details.
ESP32 Cam Indian Currency Recognition GitHub
The GitHub repository includes source code, circuit connections, and implementation details for building a real-time currency recognition system using IoT and embedded vision technology.


Frequently Asked Questions – Indian Currency Recognition Using ESP32-CAM
⇥ Does this system work without an internet connection?
No, this system requires an internet connection because the captured image is sent to the CircuitDigest Cloud API for Currency recognition processing. Without the internet, the recognition will not work.
⇥ How can I improve currency recognition accuracy?
You can improve accuracy by placing the camera in proper lighting conditions and using a clear camera angle. Increasing the image resolution and adjusting the confidence level also helps in better recognition results.
⇥ Can the system recognise old or damaged Indian currency notes?
Yes, the system can recognise slightly old or damaged notes if the important features of the currency are clearly visible. However, heavily folded or torn notes may reduce accuracy.
⇥ Can this project be used for currencies from other countries?
Yes, the project can be modified for other currencies if the cloud API supports those currency classes or if a custom model is integrated.
⇥ Why is cloud AI used instead of local AI processing?
The ESP32-CAM has limited memory and processing capability. Running advanced AI models locally is difficult. Cloud AI performs the heavy processing externally and sends only the result back to the ESP32-CAM.
⇥ Can this system recognise fake currency?
No, this project only recognises the denomination of the currency note. Detecting counterfeit currency requires additional security-feature analysis and advanced AI models.
IoT Projects Using ESP32-CAM Module
This project collection demonstrates how the ESP32-CAM module can be used to build smart IoT applications with wireless connectivity and real-time image processing. The projects include a smart WiFi video doorbell, an automated attendance system, and a real-time image capture with an email notification system.

Smart Video Doorbell using ESP32 Cam
Today, we will use an ESP32 and a camera to build a Smart Wi-Fi doorbell. This Smart doorbell can easily be powered by an AC socket, and whenever someone at the door presses the doorbell button, it will play a specific song on your phone and send a text message with a link to a video streaming page where you can see the person at the door from anywhere in the world.


Real-Time Image Capture and Send Email Using ESP32-CAM
In this project, we’ll put the ESP32-CAM to good use by capturing a clear image and sending it via email. For the sake of simplicity, we are going to use a push button to capture the image, but you can replace the button with any sensor, and it will come in very handy when you want to take a picture remotely and send it to your Email based on any event.
Complete Project Code
/*
* ESP32-CAM Currency Detection + Audio Announcement
* WITH WEB PREVIEW SERVER
*
* Changes from original:
* 1. Camera clarity: UXGA (1600×1200) with quality=8, plus sharpness/denoise tuning.
* 2. Web server on port 80:
* / → Dashboard with live MJPEG stream + last detection result
* /stream → Raw MJPEG stream (open in any browser tab or VLC)
* /capture → Single JPEG snapshot download
* /status → JSON with last currency result and heap info
* 3. Web server runs in a FreeRTOS task on Core 0.
* detectCurrency() still runs on Core 1 (loop).
* 4. During detectCurrency(), camera is deinit'd briefly for RAM —
* the stream task detects this and returns a 503 while detection runs.
*/
#include "esp_camera.h"
#include
#include
#include "soc/soc.h"
#include "soc/rtc_cntl_reg.h"
// Audio libraries
#include "AudioFileSourcePROGMEM.h"
#include "AudioGeneratorMP3.h"
#include "AudioOutputI2SNoDAC.h"
// Web server
#include
// ─── Config ────────────────────────────────────────────────────────
const char* WIFI_SSID = "Yourssidname";
const char* WIFI_PASS = "Yourwifiassword";
const char* API_KEY = "Yourapikey";
const char* serverName = "www.circuitdigest.cloud";
const char* serverPath = "/api/v1/currency-detection/detect";
const int serverPort = 443;
// ─── Pins ──────────────────────────────────────────────────────────
#define TRIGGER_BTN 12
#define SPEAKER_PIN 13
// ─── AI-Thinker ESP32-CAM Camera Pins ─────────────────────────────
#define PWDN_GPIO_NUM 32
#define RESET_GPIO_NUM -1
#define XCLK_GPIO_NUM 0
#define SIOD_GPIO_NUM 26
#define SIOC_GPIO_NUM 27
#define Y9_GPIO_NUM 35
#define Y8_GPIO_NUM 34
#define Y7_GPIO_NUM 39
#define Y6_GPIO_NUM 36
#define Y5_GPIO_NUM 21
#define Y4_GPIO_NUM 19
#define Y3_GPIO_NUM 18
#define Y2_GPIO_NUM 5
#define VSYNC_GPIO_NUM 25
#define HREF_GPIO_NUM 23
#define PCLK_GPIO_NUM 22
// ─── Globals ───────────────────────────────────────────────────────
static unsigned long lastTrigger = 0;
static volatile bool cameraActive = true; // false while deinit'd for detection
static String lastCurrency = "None yet";
static AudioOutputI2SNoDAC* g_audioOut = nullptr;
static WebServer webServer(80);
// ─── Utility ───────────────────────────────────────────────────────
static void printHeap(const char* tag) {
Serial.printf("[HEAP] %s free=%u maxBlock=%u psram=%u\n",
tag,
(unsigned)ESP.getFreeHeap(),
(unsigned)ESP.getMaxAllocHeap(),
(unsigned)ESP.getFreePsram());
}
// ─── Camera Init ───────────────────────────────────────────────────
void initCamera() {
pinMode(PWDN_GPIO_NUM, OUTPUT);
digitalWrite(PWDN_GPIO_NUM, HIGH); delay(100);
digitalWrite(PWDN_GPIO_NUM, LOW); delay(100);
camera_config_t cfg = {};
cfg.ledc_channel = LEDC_CHANNEL_0; cfg.ledc_timer = LEDC_TIMER_0;
cfg.pin_d0=Y2_GPIO_NUM; cfg.pin_d1=Y3_GPIO_NUM; cfg.pin_d2=Y4_GPIO_NUM;
cfg.pin_d3=Y5_GPIO_NUM; cfg.pin_d4=Y6_GPIO_NUM; cfg.pin_d5=Y7_GPIO_NUM;
cfg.pin_d6=Y8_GPIO_NUM; cfg.pin_d7=Y9_GPIO_NUM;
cfg.pin_xclk=XCLK_GPIO_NUM; cfg.pin_pclk=PCLK_GPIO_NUM;
cfg.pin_vsync=VSYNC_GPIO_NUM; cfg.pin_href=HREF_GPIO_NUM;
cfg.pin_sscb_sda=SIOD_GPIO_NUM; cfg.pin_sscb_scl=SIOC_GPIO_NUM;
cfg.pin_pwdn=PWDN_GPIO_NUM; cfg.pin_reset=RESET_GPIO_NUM;
// Higher clock = sharper image, less motion blur
cfg.xclk_freq_hz = 20000000;
cfg.pixel_format = PIXFORMAT_JPEG;
if (psramFound()) {
// ── CLARITY UPGRADE ──────────────────────────────────────────
// UXGA = 1600×1200 (was VGA 640×480)
// quality 8 = very high (was 12); lower number = more detail
// fb_count 2 keeps a spare frame ready while one is being sent
cfg.frame_size = FRAMESIZE_UXGA;
cfg.jpeg_quality = 8;
cfg.fb_count = 2;
cfg.fb_location = CAMERA_FB_IN_PSRAM;
} else {
// No PSRAM fallback — SVGA is the best DRAM can handle reliably
cfg.frame_size = FRAMESIZE_SVGA;
cfg.jpeg_quality = 10;
cfg.fb_count = 1;
cfg.fb_location = CAMERA_FB_IN_DRAM;
}
esp_err_t err = esp_camera_init(&cfg);
if (err != ESP_OK) {
Serial.printf("Camera init failed: 0x%x — restarting\n", err);
delay(1000); ESP.restart();
}
// ── SENSOR TUNING FOR CLARITY ────────────────────────────────
sensor_t* s = esp_camera_sensor_get();
if (s) {
s->set_brightness(s, 1); // +1 brightness (range -2..2)
s->set_contrast(s, 2); // max contrast for crisp edges
s->set_saturation(s, 0); // neutral saturation
s->set_sharpness(s, 2); // max sharpness ← NEW
s->set_denoise(s, 1); // light denoise (reduces JPEG noise) ← NEW
s->set_whitebal(s, 1); // auto white balance on
s->set_awb_gain(s, 1); // AWB gain on ← NEW
s->set_exposure_ctrl(s, 1); // auto exposure on
s->set_gain_ctrl(s, 1); // auto gain on
s->set_aec2(s, 1); // AEC DSP on (better exposure in dark)
s->set_ae_level(s, 1); // +1 AE bias (slightly brighter)
s->set_aec_value(s, 300); // initial exposure hint ← NEW
s->set_agc_gain(s, 0); // start at gain 0 (let auto take over)
s->set_gainceiling(s, (gainceiling_t)6); // max gain 128× ← NEW
s->set_bpc(s, 1); // bad pixel correction on ← NEW
s->set_wpc(s, 1); // white pixel correction on ← NEW
s->set_raw_gma(s, 1); // gamma correction on ← NEW
s->set_lenc(s, 1); // lens correction (fixes vignetting) ← NEW
s->set_hmirror(s, 0);
s->set_vflip(s, 0);
// Special: OV2640 DCW (down-sample) off gives sharper large frames
s->set_dcw(s, 0); // ← NEW
}
cameraActive = true;
Serial.println("Camera initialized (UXGA, quality=8, full sensor tuning).");
}
// ─── HTTP body reader ──────────────────────────────────────────────
static size_t readBodyFixed(WiFiClientSecure& c, char* buf, size_t maxLen) {
size_t total = 0;
uint32_t t = millis();
while ((c.connected() || c.available()) && total 8000) break;
if (!c.available()) { delay(10); continue; }
int n = c.read((uint8_t*)buf + total, maxLen - 1 - total);
if (n > 0) { total += n; t = millis(); }
}
buf[total] = '\0';
return total;
}
static void skipHeaders(WiFiClientSecure& c) {
while (c.connected()) {
String line = c.readStringUntil('\n');
if (line == "\r" || line.length() = 3) return "Connection Error";
delay(1500);
}
Serial.println("Connected!");
const char* bnd = "----ESP32Boundary";
char partHead[256];
int phLen = snprintf(partHead, sizeof(partHead),
"--%s\r\n"
"Content-Disposition: form-data; name=\"imageFile\"; filename=\"snap.jpg\"\r\n"
"Content-Type: image/jpeg\r\n\r\n", bnd);
char partTail[64];
int ptLen = snprintf(partTail, sizeof(partTail), "\r\n--%s--\r\n", bnd);
size_t contentLen = phLen + len + ptLen;
client.printf(
"POST %s HTTP/1.1\r\n"
"Host: %s\r\n"
"X-API-Key: %s\r\n"
"Content-Type: multipart/form-data; boundary=%s\r\n"
"Content-Length: %u\r\n"
"Connection: close\r\n\r\n",
serverPath, serverName, API_KEY, bnd, (unsigned)contentLen);
client.write((const uint8_t*)partHead, phLen);
for (size_t off = 0; off String {
const char* p = strstr(respBuf, key);
if (!p) return "";
p += strlen(key);
const char* e = strchr(p, '"');
if (!e) return "";
return String(p).substring(0, e - p);
};
currency = findField("\"label\":\"");
if (currency == "") currency = findField("\"class\":\"");
if (currency == "") currency = findField("\"class_name\":\"");
if (currency == "") currency = findField("\"denomination\":\"");
if (currency == "" && (strstr(respBuf,"no_currency_found") || strstr(respBuf,"no_detections")))
currency = "No currency detected";
if (currency == "") currency = "Unknown currency";
const char* rupeeVals[] = {"10","20","50","100","200","500","2000"};
for (auto v : rupeeVals) if (currency == v) { currency += " rupees"; break; }
return currency;
}
// ─── Phase 3: TTS Download ─────────────────────────────────────────
static uint8_t* downloadTTS(const String& text, size_t* outLen) {
*outLen = 0;
String encoded = text;
encoded.replace(" ", "+");
String path = "/translate_tts?ie=UTF-8&q=" + encoded + "&tl=en&client=tw-ob";
WiFiClient httpClient;
if (!httpClient.connect("translate.google.com", 80)) {
Serial.println("[TTS] HTTP connect failed"); return nullptr;
}
httpClient.printf(
"GET %s HTTP/1.1\r\nHost: translate.google.com\r\nUser-Agent: Mozilla/5.0\r\nConnection: close\r\n\r\n",
path.c_str());
uint32_t t = millis();
while (!httpClient.available() && millis() - t 0 ? contentLength + 64 : 131072;
uint8_t* mp3buf = nullptr;
if (psramFound() && ESP.getFreePsram() > bufCap + 65536)
mp3buf = (uint8_t*)ps_malloc(bufCap);
if (!mp3buf) {
Serial.printf("[TTS] Cannot allocate %u bytes\n", (unsigned)bufCap);
httpClient.stop(); return nullptr;
}
size_t total = 0;
t = millis();
while ((httpClient.connected() || httpClient.available()) && total 15000) break;
if (!httpClient.available()) { delay(5); continue; }
int n = httpClient.read(mp3buf + total, bufCap - total);
if (n > 0) { total += n; t = millis(); }
}
httpClient.stop();
if (total == 0) { Serial.println("[TTS] No MP3 data"); free(mp3buf); return nullptr; }
Serial.printf("[TTS] Downloaded %u bytes\n", (unsigned)total);
*outLen = total;
return mp3buf;
}
// ─── Phase 4: Playback ─────────────────────────────────────────────
static void playMP3(const uint8_t* mp3data, size_t mp3len) {
if (!mp3data || mp3len == 0) return;
printHeap("before playMP3");
AudioFileSourcePROGMEM* src = new AudioFileSourcePROGMEM(mp3data, mp3len);
AudioGeneratorMP3* mp3 = new AudioGeneratorMP3();
if (mp3->begin(src, g_audioOut)) {
while (mp3->isRunning()) { if (!mp3->loop()) mp3->stop(); }
Serial.println("[TTS] Playback complete.");
} else {
Serial.println("[TTS] MP3 begin() failed");
}
delete mp3; delete src;
}
// ═══════════════════════════════════════════════════════════════════
// WEB SERVER — handlers
// ═══════════════════════════════════════════════════════════════════
// ── Dashboard HTML ─────────────────────────────────────────────────
static const char DASHBOARD_HTML[] PROGMEM = R"rawhtml(
ESP32-CAM Currency Detector

CAM
Last Detection
—
Heap: —
PSRAM: —
Uptime: —
)rawhtml";
// ── Handler: dashboard ─────────────────────────────────────────────
void handleRoot() {
webServer.send_P(200, "text/html", DASHBOARD_HTML);
}
// ── Handler: MJPEG stream ──────────────────────────────────────────
void handleStream() {
if (!cameraActive) {
webServer.send(503, "text/plain", "Camera busy during detection");
return;
}
WiFiClient client = webServer.client();
client.print(
"HTTP/1.1 200 OK\r\n"
"Content-Type: multipart/x-mixed-replace; boundary=frame\r\n"
"Cache-Control: no-cache\r\n"
"Connection: close\r\n\r\n");
while (client.connected()) {
if (!cameraActive) break; // detection started — bail out
camera_fb_t* fb = esp_camera_fb_get();
if (!fb) { delay(30); continue; }
client.printf(
"--frame\r\n"
"Content-Type: image/jpeg\r\n"
"Content-Length: %u\r\n\r\n", (unsigned)fb->len);
client.write(fb->buf, fb->len);
client.print("\r\n");
esp_camera_fb_return(fb);
delay(50); // ~20 fps cap — raise to 33ms for ~30 fps if your network handles it
}
}
// ── Handler: single snapshot ───────────────────────────────────────
void handleCapture() {
if (!cameraActive) {
webServer.send(503, "text/plain", "Camera busy");
return;
}
camera_fb_t* fb = esp_camera_fb_get();
if (!fb) { webServer.send(500, "text/plain", "Capture failed"); return; }
webServer.sendHeader("Content-Disposition", "inline; filename=\"snap.jpg\"");
webServer.sendHeader("Cache-Control", "no-cache");
webServer.send_P(200, "image/jpeg", (const char*)fb->buf, fb->len);
esp_camera_fb_return(fb);
}
// ── Handler: JSON status ───────────────────────────────────────────
void handleStatus() {
char buf[256];
snprintf(buf, sizeof(buf),
"{\"currency\":\"%s\","
"\"busy\":%s,"
"\"heap_free\":%u,"
"\"psram_free\":%u,"
"\"uptime_s\":%lu}",
lastCurrency.c_str(),
cameraActive ? "false" : "true",
(unsigned)ESP.getFreeHeap(),
(unsigned)ESP.getFreePsram(),
millis() / 1000UL);
webServer.send(200, "application/json", buf);
}
// ── Web server task (Core 0) ───────────────────────────────────────
static void webServerTask(void*) {
webServer.on("http://www.bing.com/", handleRoot);
webServer.on("/stream", handleStream);
webServer.on("http://www.bing.com/capture", handleCapture);
webServer.on("/status", handleStatus);
webServer.begin();
Serial.println("[WEB] Server started on port 80");
for (;;) { webServer.handleClient(); delay(2); }
}
// ═══════════════════════════════════════════════════════════════════
// DETECTION FLOW
// ═══════════════════════════════════════════════════════════════════
void detectCurrency() {
printHeap("detectCurrency start");
// Phase 1: Capture
camera_fb_t* fb = esp_camera_fb_get();
if (fb) esp_camera_fb_return(fb);
delay(250);
fb = esp_camera_fb_get();
if (!fb) { Serial.println("Capture failed!"); return; }
size_t imgLen = fb->len;
Serial.printf("Frame: %u bytes\n", (unsigned)imgLen);
uint8_t* imgBuf = nullptr;
if (psramFound() && ESP.getFreePsram() > imgLen + 65536)
imgBuf = (uint8_t*)ps_malloc(imgLen);
if (!imgBuf && ESP.getMaxAllocHeap() > imgLen + 32768)
imgBuf = (uint8_t*)malloc(imgLen);
if (!imgBuf) {
Serial.println("No memory for frame!");
esp_camera_fb_return(fb);
return;
}
memcpy(imgBuf, fb->buf, imgLen);
esp_camera_fb_return(fb);
// Deinit camera — signal web task to stop streaming
cameraActive = false;
delay(50); // let any in-flight stream handler finish its current frame
esp_camera_deinit();
delay(150);
printHeap("after cam deinit");
// Phase 2: API
String currency = sendImageToAPI(imgBuf, imgLen);
free(imgBuf);
lastCurrency = currency;
Serial.println("=== Detection Result ===");
Serial.println(currency);
Serial.println("========================");
printHeap("after API, before TTS download");
// Phase 3: Download TTS
size_t mp3Len = 0;
uint8_t* mp3Buf = downloadTTS(currency, &mp3Len);
// Phase 4: Play
if (mp3Buf) { playMP3(mp3Buf, mp3Len); free(mp3Buf); }
else { Serial.println("[TTS] Skipping audio (download failed)"); }
// Reinit camera and re-enable stream
initCamera();
cameraActive = true;
printHeap("detectCurrency end");
}
// ═══════════════════════════════════════════════════════════════════
// SETUP / LOOP
// ═══════════════════════════════════════════════════════════════════
void setup() {
WRITE_PERI_REG(RTC_CNTL_BROWN_OUT_REG, 0);
Serial.begin(115200);
delay(500);
pinMode(TRIGGER_BTN, INPUT_PULLUP);
initCamera();
g_audioOut = new AudioOutputI2SNoDAC();
g_audioOut->SetPinout(14, 15, SPEAKER_PIN);
WiFi.mode(WIFI_STA);
WiFi.setSleep(false);
WiFi.begin(WIFI_SSID, WIFI_PASS);
Serial.print("Connecting to WiFi");
while (!WiFi.isConnected()) { delay(500); Serial.print("."); }
Serial.printf("\nConnected: %s\n", WiFi.localIP().toString().c_str());
// Print the URL prominently
Serial.println("─────────────────────────────────────────");
Serial.printf(" WEB PREVIEW → http://%s\n", WiFi.localIP().toString().c_str());
Serial.printf(" MJPEG STREAM → http://%s/stream\n", WiFi.localIP().toString().c_str());
Serial.println("─────────────────────────────────────────");
configTime(19800, 0, "pool.ntp.org", "time.nist.gov");
Serial.print("Syncing time");
for (int i = 0; i 100000 ? "\nTime synced!" : "\nTime sync timeout");
// Start web server on Core 0 (loop runs on Core 1 by default)
xTaskCreatePinnedToCore(webServerTask, "WebSrv", 8192, nullptr, 1, nullptr, 0);
printHeap("setup complete");
Serial.println("Ready — press button to detect currency.");
}
void loop() {
if (digitalRead(TRIGGER_BTN) == LOW && millis() - lastTrigger > 2000) {
lastTrigger = millis();
delay(150);
Serial.println("Button pressed! Detecting currency...");
detectCurrency();
}
delay(10);
}


